Overwintering Plants: Bring Your Garden Indoors
Overwintering plants for the winter can be a bittersweet experience – the transition from vibrant outdoor gardens to the coziness of indoor spaces. Questions like “Which plants can I bring inside?” and “Will my plants survive the winter indoors?” often fill the minds of gardeners. With proper care, perennials, bulbs and shrubs or outdoor containers can thrive in your home and return to your garden in the spring. In this guide to overwintering plants, we will explore which plants can be brought indoors and delve into the eight essential steps.
In this Article
- When to Bring Plants inside
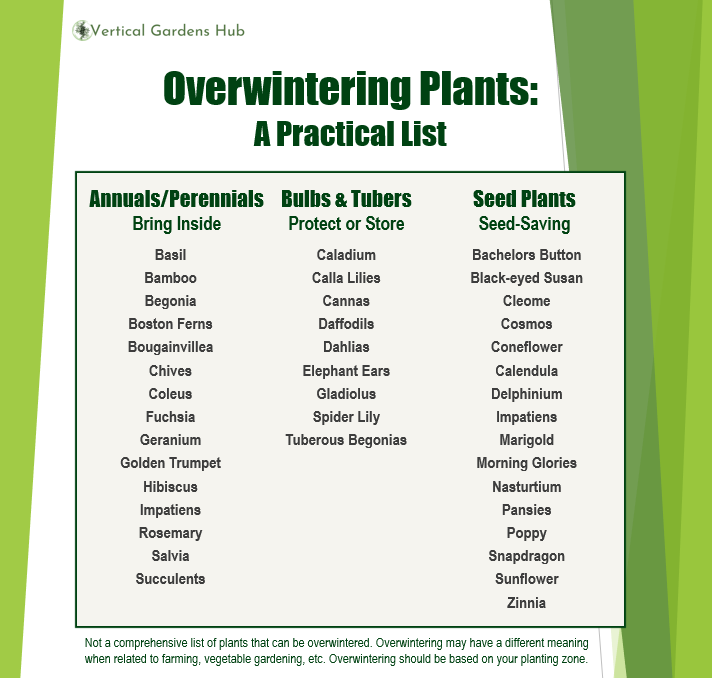
- Which Plants Can Be Brought Inside?
- Actively Growing Plants
- Dormant Plants
- Save Some Seeds
- 8-Step Guide to Bring Plants Inside
- Begin Early
- Prune and Clean
- Those Darn Pests
- Repot or Refresh Soil
- Spa Treatment
- Acclimate, Acclimate, Acclimate
- Plant’s Indoor Needs
- Keep Out of Reach
When to Bring Plants Inside
As fall and colder temperatures approach, especially at nighttime, it’s time to begin the process of moving your outdoor plants indoors. Many tropical plants, herbs, succulents, and non-hardy plants will not survive the cold, frost, or snow of winter. As a rule of thumb, bring tender plants inside when nighttime temperatures consistently drop below 50° to 55°F. Any colder, you might see damage to your plants leaves.
Which Plants Can Be Brought Inside?
The decision to overwinter plants begins with choosing the ones worth keeping. You may choose your favorites, those given to you as a gift, or ones that are expensive to re-purchase. Consider the diverse types of plants like those that need to go dormant and those that produce seeds where seed-saving is another option. An easy decision is to keep plants that are not diseased or have pest problems.
When choosing plants to bring inside, consider your space and indoor lighting too. Overwintering plants placed in an incorrect spot can be detrimental no matter how well cared for. In winter, a west or south-facing sunny area has the winter light intensity of a shady summer area. Also keep them away from drafts and vents.
This can serve as a starting point but do explore other plant options. Research is your ally when determining the suitability of a specific plant for indoor living during winter.
Actively Growing Plants
These plants, including annuals, coleus, and herbs do keep growing through the winter months but need a spot in the sun. Sun levels will not be that of the summer, so acclimate these plants to lower lighting levels for about two weeks before moving them indoors. While some plants can cope better with changes in temperature and light, some may wither and drop their leave as they adjust to their new environment.
Don’t push active growth for these plants, as shorter days means less watering and fertilization. And don’t forget when arranging these plants in their new home, put the shorter ones closer to the light, so the taller ones don’t shade them.
Another option – take some cuttings. This is a great option with coleus, sweet potato vine, Impatiens, and wax Begonias to name a few. Cuttings should average 2-3 inches and it is best to remove the bottom set of leaves. These can be rooted in water, but for best results plant them in a cell pack filled with potting soil, burying the lowest node.
Dormant Plants
Many bulbs “require” a dormant time in a cool place when the temperature is still above freezing—Calla Lilies, Dahlias, Elephant Ears, and Gladiolus to name a few. Just remember to dig up your bulbs prior to the ground freezing.
Bulbs in Pots: These bulbs can survive the winter months when taken care of properly:
- Stop watering and cut off all the dying foliage
- Place in a cool, dark spot and let them sit
- Check the soil moisture and give them a small drink if needed
Bulbs in the Ground: These require a bit of work to have them ready for next spring.
- Dig them up, brush off as much dirt as you can and cut the foliage back
- Place them in a warm, dry area for 7-10 days to remove any excess moisture
- Transfer the bulbs to a cardboard box, separated by shredded newspaper or dry peat moss
- Place a cold, dark spot until you can pot them up in the spring a month prior to placing them outside.
Save some Seeds
Many plants produce seeds that you can save and plant from one season to the next. The most obvious reason to save seeds is to save money, but there is something oddly satisfying about nurturing a plant from a saved seed.
Seed-saving has become a lost art as we rely on our favorite garden centers to readily have these available. It’s simple and the seeds are ready when we need them. However, these seeds may not be suited to your region and are most likely genetically modified.
Some plants make it easy to save their seeds like zinnias with their big flowers and seeds, others hold their seeds in a seedpod. For plants like black-eyed Susans, you’ll have a race with the birds to get the seeds. A general rule is to let the seeds fully ripen in their pods before harvesting.

Eight Tips to Bring Plants Inside
1. Begin Early
Ideally, the process of overwintering should start early to mid-September. Even then you’ll need to watch the forecast for early frost. Move plants to a shady location to help them adjust to the lower light winter conditions they’ll receive indoors.
2. Prune and Clean
Remove any dead, unhealthy, or leggy growth. Pruning not only encourages new growth, and helps to control their size, but also prevents the spread of diseases indoors.
3. Check for Pests
Before bringing your plants indoors, be vigilant about pests that may come along for the trip and spread to other plants. Mealybugs, thrips, or spider mites can wreak havoc on your houseplants. Examine the soil, leaves, and even the drainage holes for any unwanted guests and even if you don’t see any give them a good hosing down with outside water. Once dry, give your plants leaves, stems and trunks a thorough spray of insecticidal soap or dish soap spray.
4. Repot or Refresh Soil
Consider repotting your plant if its over grown its container. If repotting isn’t on your agenda, mix in fresh soil and add a top layer. This soil infusion will provide essential nutrients for your plant.
5. Spa Treatment
Give your plant a refreshing rinse to remove dust, dirt, and any lingering bugs (alive or dead). This water treatment is also the perfect time for a deep watering to ensure your plant is well-hydrated.
6. Acclimate, Acclimate, Acclimate
Plants can find an abrupt shift from outdoors to indoors a bit challenging. As mentioned earlier, now is the time to start moving your plants to a more shaded location for up to 2 weeks prior to moving them indoors – the longer the better. While some plants can cope better with changes in temperature and light, some may wither and drop their leave as they adjust to their new environment.
7. Consider the Plant’s Needs Indoors
Transitioning outdoor plants indoors requires careful consideration of their specific needs:
- Sunlight: Ensure your plant receives adequate light indoors, especially if it requires bright sunlight outdoors. Consider a grow light if you feel your plants are getting enough light.
- Air Circulation: Proper airflow prevents stagnant water, reducing the risk of fungus and rot. Keep plants away from cold drafts and heat vents as it may be too much for them causing damage to their leaves.
- Drainage: Poor drainage can lead to waterlogged roots and unhealthy growth. Put a saucer under the plant to protect furniture and floors but don’t let the water sit.
- Water and Fertilizer: Reduce water and fertilizer during the plant’s slow growing or dormant winter period. The soil should be dry to the touch about 2” down before watering. As days become longer in the spring, watering can slowing increase.
- Humidity: Combat dry indoor air with extra humidity buy misting plants daily, especially if leaf tips are turning brown.
8. Keep Out of Reach
Once inside, if you have curious pets or children/grandchildren, ensure your plants are safely out of reach. Some plants can be toxic if ingested, so it’s essential to be cautious.
Final Thoughts
Overwintering plants is a rewarding experience and allows you to enjoy the beauty of your garden year-round. By following these steps and choosing the right plants, you can create a thriving indoor garden that sustains both your passion for gardening and the health of your plants. So, as the temperatures drop and the frost creeps in, bring your favorite plants indoors, and let them thrive in the warmth of your home.
Overwintering Plants FAQs
Q: Can I bring any outdoor plants indoors for the winter? While many plants can be brought indoors, not all will thrive in an indoor environment. It’s essential to research the specific needs of each plant before making the transition.
Q: How do I prevent pests from coming indoors with my plants? Thoroughly inspect your plants and soil for pests before bringing them inside. Consider using natural remedies or insecticidal soaps to eliminate any unwanted visitors.
Q: What should I do if my plant isn’t getting enough light indoors? If natural light is insufficient, consider using grow lights to provide the necessary light for your plants. Positioning plants near a south-facing window can also help.
Q: Do all plants need the same amount of water during the winter indoors? No, the water requirements of indoor plants vary. Many plants enter a dormant phase during winter and require less water. Always adjust your watering schedule to match your plant’s needs.
Q: Are there any benefits to overwintering plants indoors beyond preserving them from winter cold? Yes, overwintering can help preserve rare or sentimental plants, promote growth in warmer climates, and continue enjoying fresh herbs and flowers during the winter months.


